Thursday, August 1, 2013

Double Chocolate Chip Muffins

It's a blah day again-rainy, humid, and super gross. Blahh. So I asked myself, what makes blah days better?? Answer-CHOCOLATE!!! Now I know muffins aren't the greatest summer treat or anything special, but just have a really special place in my heart, because who can't love a warm, chocolatey muffin straight out of the oven. 


These muffins are great. Super easy to make, and no weird ingredients, just the normal stuff you have in your pantry. These are also a great gift, not to mention a easy breakfast or anytime snack. They are so perfectly chocolatey, it's addictive! 


I found this cute and super easy recipe in one of my trusty cookbooks. Funny enough, the cookbook is mostly cookies. This is my twist on the regular chocolate chip muffin recipe. So go ahead all you chocolaholics, and sweet freaks, this is the muffin recipe for you! Enjoy!

Double Chocolate Chip Muffins:

Ingredients:
1/2 cup (1 stick) unsalted butter, slightly melted
1/3 cup granulated sugar
2 tbsp dark brown sugar
2 eggs
1 1/2 tsp vanilla
1 1/2 cups flour
1 tsp baking powder
1/8 tsp salt
1 3/4 tbsp unsweetened cocoa
2/3 cup milk
1 cup semi sweet chocolate chips

Directions:
Preheat the oven to 375 degrees Fahrenheit. Line a 24-muffin tin with paper liners, or grease each cup. 

Cream butter and sugars. Beat in the eggs, one at a time, then the vanilla. 

In a separate bowl, whisk together flour, baking powder, salt, and cocoa until well combined. Beat into the dry mixture, alternating with the milk, until well mixed. 

Divide the batter in half. Divy out one half into the prepared muffin tins. Then sprinkle half the chocolate chips over. Spoon the rest of the batter to cover the chocolate chips, and then sprinkle more chocolate chips on top. 

Bake for 17-20 minutes, or until the tops spring back when touched lightly. Make sure a toothpick or cake tester comes out with only a few crumbs left on it. Let cool slightly, then enjoy!
(I highly recommend a glass of milk to go with these, because what's better?) 


Sunday, June 23, 2013

Smores Tart

Ah summer. The perfect time for having a nice barbecue party, listen to some beach tunes, and then gather around the fire pit for the best part of the night-the smores. This past Friday was our first smores night of the summer, and it was perfection. (Little hint; try roasting PEEPS!) yes you saw that right, we roasted peeps. I love playing around with the smore. It is so versatile and there are tons of different add-ins you can put on to make it your own. But since we had peeps left over from springtime, I knew this was the perfect thing to try, and it was quite perfect.


Speaking of perfection, let me introduce to you the latest smore creation I happened to stumble upon-the smores tart. I was doing my usual pinning, when I happened to come across this. Anything with smores involved typically grabs my interest, and then never lets go. In found it at Rock Recipes, and I knew I had to make this, and make it my own. I was determined. 


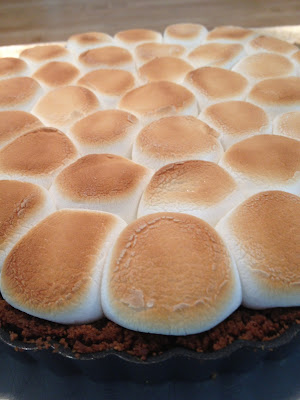
This actually turned out quite well. The tart has a great variety of textures, it starts with a nice golden graham cracker crust, then changes to a silky-smooth dark chocolate custard in the middle, and is topped with golden marshmallows. Can you taste it yet? I can't even describe how amazing this is, so I guess you are just going to have to try it for yourself. Enjoy!


Smores Tart:

Ingreditents:
1 1/2 cups graham cracker crumbs
3/4 cup unsalted butter, melted
1 tsp vanilla etract
1 tbsp granulated sugar

4 oz dark chocolate, chopped
3 oz semi-sweet chocolate, chopped
7 oz whipping cream
3 oz milk
1 1/2 tsp vanilla
1 egg, beaten

About 40 marshmallows, cut in half

Directions:
Preheat the oven to 350 degrees Fahrenheit. Grease a 9 inch tart pan. 

Mix the graham cracker crumbs, butter, vanilla, and sugar in a medium bowl until completely combined and start to stick together. Press into the bottom and sides of the tart pan. Bake for 5-10 minutes, until slightly hardened. Let cool slightly.

Bring the milk and cream to a boil in a small saucepan. Place chopped chocolate in a heat-proof bowl. Pour boiling liquid over the chocolate. Let sit for 5-10 minutes, then whisk until smooth and silky. Cool for 10 minutes. Whisk in vanilla and egg. Pour into the tart pan, and bake for about 20 minutes. The middle should still be a little wobbly.

Change the oven setting to broil, and place the tart pan on another baking sheet in order to rotate it easier.

Arrange the marshmallows in a circular pattern, starting with one marshmallow in the center, and working outwards. Place pan in the broiler. Every 15-30 seconds, rotate the pan 90 degrees or so, in order to evenly brown the marshmallows. DO NOT take eyes away from the oven. When they have reached a desired brownness, remove pan and let cool completely. Serve at room temperature with whipped cream.


Thursday, May 16, 2013

Raspberry Yogurt Bundt Cake with Dark Chocolate Ganache

It's been a while. Typical Bella. What can I say, this time of year is hectic for just about everyone. With the spring finally in full swing (haha i would not be a good rapper) everyone seems to have a million different activities going on. Whether it's going to lacrosse games or just a family dinner, you barely have time for yourself, let alone bake a cake. Which is why this recipe is so good.


This cake is really something special. Not only is it super easy, it also it cute as a button, extremely light, and when covered in chocolate, is the most perfect dessert ever. It has nice undertones of orange in it as well. One rule I live by that i advise you of is always use fresh orange juice. This recipe calls for juice and zest, don't skimp out. Buy a nice little juicer if you don't own one (mine's super cheap and plastic, it doesn't have to be high-tech) and trust me, fresh juice always will make your cake taste better. It improves the whole quality and freshness of the cake. Also try to use fresh raspberries. The frozen ones work, but fresh is always better. You'll thank me later :) Also, if you are not a fan of the ganache, the original recipe did include a glaze (see the recipe later) but I thought it would transform the cake from tea time treat to after dinner dessert


This cake was just so perfect. I served it to my family last weekend, and what a good move that was on my part. They finished the entire thing! My mom, who has tried basically all my new recipes and experiments, even claimed this was the best one she has had to date. Who couldn't resist the flavors of dark chocolate and raspberry? (Have you ever had the Ghiradelli dark chocolate raspberry squares? they are to DIE for, just in case you didn't notice, they are kidn of my favorites). So thank you Bon Appetit for this AMAZING recipe...I'm gonna be using this one a lot. I hope you enjoy it too!!!

Raspberry Bundt Cake with Chocolate Ganache:
Ingredients:
3 cups all purpose flour
1 1/2 tsp baking powder
1/4 tsp salt
1 cup (2 sticks) unsalted butter (very soft)
1 3/4 cups sugar
2 Tbsp fresh orange juice
1 tsp orange zest
2 tsp vanilla
3 eggs
1 cup plain or vanilla fat-free yogurt
2 1/2 cups raspberries (2 packages)
1/2 cup dark chocolate
1/4 cup milk/ semi sweet chocolate
1/3-1/2 cup heavy cream
Confectioner's sugar (optional)

Directions:
Preheat the over to 350. Grease a 12 cup bundt pan. Whisk 2 1/2 cups of flour, baking powder, and salt into a medium bowl. 

In a separate bowl, gently toss raspberries in flour and set aside.

Cream butter and sugar in a large bowl. Mix in orange juice, then zest. Add vanilla and beat in eggs one at a time. Mix in yogurt. Gently fold in raspberries. 

Pour batter and spread evenly into bundt pan. Bake for 50 minutes to an hour, or until golden brown on top and a cake tester comes out clean. Let cool slightly.

Ganache:
In a small saucepan over medium-low heat, melt chocolate and heavy cream, stirring constantly. Remove from heat when mixture becomes silky. Let cool slightly.

Fill a pastry bag fitted with a small circle tip, or cut a small hole in the bottom. Drizzle over the top of the cake. Dust powdered sugar over the top. Serve while it's still warm. 


Sunday, April 14, 2013

Chocolate Fudge Flourless Cookies

Let me take a moment to describe these cookies to you. First off, they are CHOCOLATE. Pure, smooth, rich, fudgey, and CHOCOLATE. These cookies are very light, yet have a very full flavor. They also have a hint of espresso in them, perfectly bringing out the darker tones of chocolate. The cookies are also super light and moist, and they aren't all that bad for you (my excuse for polishing off more than three in a sitting). Plus they are flourless-which has lots of benefits. They are especially good for people who have Celiac's disease (allergic to gluten). Story time!


Last year, my best friend found out she was allergic to gluten AND dairy. A horrible combination. When she told me, the first thing I did was research everything on gluten free and dairy free baked goods. I discovered the wondrous almond milk, delightful coconut oil, and gluten free flour. I didn't even know that was possible! With my new knowledge and new foods, I found a great variety of baking recipes to try. (Serious brownie points right there, no pun intended) I'm just trying to make sure that no matter what, she doesn't feel left out because no one wants to not be able to eat a perfect cookie right?


Anyways, I made this recipe a while back, and I cannot wait to make it again. It's actually pretty simple. And while it's not dairy free too (there are egg whites) you can easily make it so by using egg substitute. This recipe is my altered version of King Arthur's Flour's recipe.

Chocolate Fudge Flourless Cookies:
2 1/4 cups confectioner's sugar
1/2 teaspoon salt
1 1/2 tsp espresso powder
3/4 cup cocoa powder
1/4 cup dark cocoa powder (I used Hershey's special dark chocolate)
3 large egg whites
2 1/2 tsp vanilla extract
Extra Confectioner's Sugar, for dusting

Directions
Preheat the oven to 350 degrees Fahrenheit. Line 2 or 3 baking sheets with parchment paper. 

Combine sugar, salt, espresso powder, and both cocoas into a large mixing bowl. Whisk together until combined. 

Add the egg whites and vanilla. Mix until smooth and shiny. Spoon 1-2 teaspoon size drops of batter onto the baking sheets. Bake for 6-8 minutes, until the cookies form small cracks on the tops of the cookies. Let cool completely. Dust with confectioner's sugar when cool. Bon Appetit!

Wednesday, April 3, 2013

Robin's Egg Chocolate Chip Cookies

Ah, spring. The time for cleaning, constantly checking the weather to see if its FINALLY warm enough for shorts, and.......baking? Well baking 's pretty much a year round thing for me. But this recipe is especially springy. This time of year, the robin's eggs whoppers are always out. I love them! For those of you aren't familiar with the robin's eggs, they are just these huge malted milk balls with a hard candy coating in the shape of robins eggs. Now they aren't the healthiest things in the world, but hey, we all have to satisfy our sweet tooth once and a while right?


So this recipe I found via Pinterest (where else?) from Sugary Sweets. I added a few of my own little flairs though. This is a really great cookie. It is your typical chocolate chip, only much chewier thanks to the robins eggs and baking soda. Plus it has a great malty taste to it. Now if you are like me, you will look at some of the ingredients and your eyes may pop (3 sticks of butter?!). But don't let that turn you away. This batter makes A LOT of cookies. I got about 90, you could probably stretch and get 100 out of them, depending on size. So even though the ingredient quantities may seem large, don't freak out.


So indulge in a little taste of spring. These cookies are soo indulgent, I could eat a ton if I didn't have any self control, which I don't :). These are great party cookies, and if you bring these around, I promise you, you will make some new friends along the way. 

Robin's Eggs Chocolate Chip Cookies:
2 1/2 cups Whoppers Robins Eggs, divided
3 cups all purpose flour
3/4 tsp salt
1 tbsp baking powder
3 tsp malt powder
1 1/2 cups unsalted butter, very soft
1 1/2 cups light brown sugar
1/4 cup milk
1 tbsp vanilla
2 eggs
1 cup chocolate chips

Directions
Crush 1 1/2 cups robins eggs in a food processor until they become a fine powder. Set aside. With the remaining cup of robins eggs, crush softly with a mallet, about one hit per egg.

Whisk together the flour, salt, baking powder, and malt powder in a medium bowl. Carefully mix in the finely crushed candy. Set aside.

In a stand mixer, cream butter and brown sugar until fluffy. Mix in the milk, vanilla, and eggs, one at a time, until smooth. Beat in the flour mixture. Remove from the mixer and fold in the lightly crushed candy and the chocolate chips. Refrigerate dough for about 45 minutes to an hour. 

Preheat the oven to 375 degrees Fahrenheit. Line many baking sheets with parchment paper. Take the dough out of the refrigerator and drop by the teaspoonful. Make cookies about one inch in diameter. Bake for 6-8 minutes, or until lightly browned. Cool completely before serving, then enjoy!!


Thursday, March 21, 2013

Irish Soda Bread

Ok, I know it's almost a week after St. Patrick's day. And lets be honest, what other day do we eat corned beef, soda bread, or stewed vegetables. If you're like me, that's never. My cousin helped me come to this realization a few days ago, Irish food, "pub grub" is really good, but we just don't eat it on a normal basis. It's kind of a shame, because I have always really enjoyed Irish soda bread.


Well, that's somewhat a lie, I actually hated it as a kid. I hated raisins, and it tasted to bland for my solely processed sugar palate. But now I can't get enough of it. The best kind of soda bread is a little chewy on the inside, but perfectly crunchy and crumbly on the outside. So as St. Patty's rolled around, I knew it was time to make my first Irish Soda Bread. 

I did a lot of research actually before I got baking. I found that there are actually two kinds of Irish soda bread, the Irish kind, and the American. The Irish is pretty bland, just flour, salt, buttermilk, and baking soda. I found out that the bread was made up in Ireland because the Irish weren't big on yeast. So when baking soda was discovered the Irish found it was a quick and easy way to leaven bread, without their dreaded yeast. In the US, they Irish immigrants brought over the recipe and of course, the Americans had to add their own flair. They made it sweeter, by adding a little sugar and raisins. Still having the sweet tooth I did as a kid, I prefer the latter. And I decided to be just like those immigrants and add a touch more of Bella into the bread by adding a few more flavors to this one recipe I found and liked on the Food Network site.

So this bread is more of a non-traditional, American-style Irish soda bread. Even though it is not that much sweeter, if you prefer the more traditional bread, just take out the cranberries and honey. But I got a really good response from this recipe. We had a few friends come over for a St. Patrick's day dinner, and it was completely gone by the time everyone left! So enjoy my non-traditional soda bread, even if it's not Saint Patty's day, you can still enjoy the little sprinkle of Irish in everyone. 

Non-Traditional Irish Soda Bread:
3 cups plus extra flour
1/4 cup sugar
1 tbsp baking powder
1 tsp baking soda
1/2 tsp salt
4 tbsp unsalted butter, slightly cooler than room temperature, cubed
1 cup raisins
1/4 cup dried cranberries
1 cup buttermilk
1 1/2 tbsp honey
1/2 tsp vanilla
1 egg

Directions:
Preheat the oven to 400 degrees. Line a 8 or nine inch round pan with parchment paper, covering all sides and with extras on the top. 
In a large bowl, whisk the flour, sugar, baking powder, baking soda, and salt until well combined. Rub in the butter with your fingers until all the lumps of butter are gone. Stir in the raisins and cranberries.
In a small bowl, beat the buttermilk, honey, vanilla, and egg with a whisk. Fold into the raisin mixture until a sticky dough forms.
Transfer the dough onto a floured surface. Knead the dough gently, not more than 4 times, until it forms a ball/ round shape. Place dough into the lined pan, and lightly sprinkle the top with flour. Bake at 400 for 15 minutes, then lower the temperature to 350 and cook for about 20 more minutes, or until the top of the bread is browned and a cake tester comes out clean. Serve immediately.

Just a side note-if you do have leftovers, they do not keep well past the first day. I recommend putting the rest in a freezer safe bag and storing it in the freezer. This bread makes a lovely toast. Enjoy!

Sunday, March 17, 2013

Scottish Shortbread

The Scots got one thing right-their shortbread. Let me brief you a little on this fantastic tea-time treat. There are basically two kinds of shortbread, the thinner kind that is usually a denser, crunchier cookie, or there's the thicker, chewier kind as well. I like both, but right now with the cold weather and everything, I'm always craving a perfectly soft, warm buttery cookie right out of the oven. The kind you can savor each bite, while it melts in your mouth and satisfies your palette. Yep, the Scottish definitely scored big time with this one.

This recipe is super easy. There aren't any complex instructions or hard to find ingredients. As long as you don't fear making dough (which I did for the longest of time), this recipe will be a great after-work snack to make. The only important thing is to make sure you score the dough with a knife prior to baking, then cut it completely right after it comes out of the oven. This will insure that the pieces don't fall apart, and the dough won't rise. One other thing, you should really let them cool in the pan before you eat one, but if you're impatient like me, just stick it in the refrigerator for a few minutes to let it firm up.

Yeah not my best picture, it was so rushed because everyone was lining up to get some! I couldn't even let it cool all the way!


So let's just take a minute to thank the Scottish. I actually found out somewhat recently I have some Scottish heritage on my mom's side, which also spurred me to make this recipe. Let's also thank Baking Bites, which is where I got my recipe. The pics on that blog are a lot better than mine. I was in kind of a rush so i only got about 1 or two. Other than that, I really hope you enjoy this recipe. It goes really nice with a glass of milk or hot tea, a blanket, and a good book. Enjoy, and "here's tae us, wha's like us? Damned few an' they're a' deid", which is a classic Scottish toast, according to Ominglot. :)

Scottish Shortbread:
3 cups flour
3/4 cup sugar
1/4 tsp salt
1 cup unsalted butter, chilled
1 tsp vanilla extract

Preheat the oven to 350. Whisk together flour, sugar, and salt until blended. Put mixture in a food processor. Mix in the butter and vanilla until mixture forms a sandy texture. (Alternate method for those patient enough to try: Rub in the butter and vanilla with your hands). If dough is too dry, mix in a tablespoon of cold water, or more, to make the dough come together. Press dough firmly into a 9x9 inch pan, making sure it is even on all sides. Lightly score the dough with a knife, making squares/bars (which will be the shortbread's serving size after it bakes). Bake about 30 minutes, or until lightly golden. Immediately cut all the way into the knife marks made earlier. DO NOT REMOVE FROM PAN, at least until cooled. Serve warm, or store in an airtight container. Enjoy!